In pre-war times most demand for building materials was met from local sources, the main exceptions were cut timber, slates and tiles and to some extent bricks.
A local building project would generate a demand for ancillary items such as cast iron baths, iron guttering sections, iron and clay drainage pipes and such like. Open wagons and open containers of the C, D and H types were all used for building materials. In the days when the small station goods yard still existed a hand operated rail crane might be based at a small country yard to deal with this traffic during the construction work.
Corrugated iron sheet
One building material that was regularly shipped around the country was corrugated galvanised iron sheeting. Corrugated iron was invented in 1825 by a London builder called Richard Walker, the corrugations make a thin sheet of metal much more rigid, the ribs usually run along the long axis of the sheet and the pitch (distance between ridges) has ranged from about five inches down to about two inches although since the 1940s a standard of three inches has become most common. It was supplied in flat sheets and also in curved sections suitable for making curved roofs of indistrial buildings, barns and the famous Nissen hut.
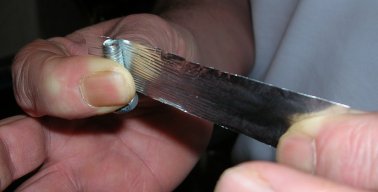
When I was a military modeller I produced a lot of 'corrugated iron' using bolts or threaded bar to emboss aluminium cooking foil. Ideally you need something like a mouse mat (or any fairly firm sheet of rubbery material, I used to use a scrap of rubber insertion jointing from the ships engine room), you lay the foil on this and tape the ends down and roll the threaded bar or bolt along whilst pressing down (a foot of 1"x1" timber is handy to press down with as you roll). For odd sheets you can produce lengths by holding a strip of foil firmly against the bolt with your thumb and pulling it through as shown below.
Fig___ Making corrugated iron sheet
To make a stack trim a strip of paper to the required width and cut lengths of this, stacking these until the required depth is reached (I tend to cut a long strip and then fold it concertina fashion with a trace of glue between the folds). Then add a strip of embossed foil to the top (PVA works, Bostic works better but its stringy stuff, difficult to work with). By forming the paper round a tube you can make a stack of curved sheets.
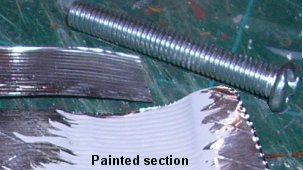
This is fine for OO but the problem in N is that something like a scale 3" pitch is effectively invisible once painted. For pre-war layouts you can use a larger bolt (to make 5" pitch, just short of 1mm) which does show up but for post war layouts you are probably better off printing the top sheet.
Fig___ Painted 3" pitch corrugated iron sheet
I got a better result in N by cutting a strip of 20 thou card to the required width (6mm, three scale feet, so a man could manage a sheet), coating this in a thin layer of Milliput then draging the bolt across this to score the surface. Don't try rolling the bolt, this works when the putty is first applied but after a minute or so it tends to roll up the putty into the threads. Galvanised iron is light grey, almost silver, when new. In use it is painted but I believe it was shipped unpainted.
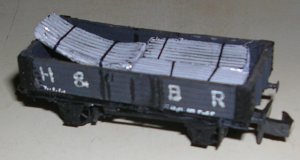
This material is light and needs to be tied down in transit, as I favour removable loads (although in practice I seldom if ever remove a load on the layouts) I just add black thread round the 'stacks', a more prototypical approach would have the ropes taken over the sides of the wagon and down to the rope hooks on the chassis and often to the buffr housings on the ends. This material is most prone to damage on the edges, so curved sections should be laid down, usually with the concave side uppermost. The example shown below is made from corrugated foil (using a large bolt to represent 5 inch pitch corrugations) glued to strips of paper to form the stack and wrapped with black thread. Note how the curved sections are resting against the end of the wagon, if all the load were curved it would be resting (and tied) against each end of the wagon.
Fig___ Model wagon with load of corrugated iron sheet
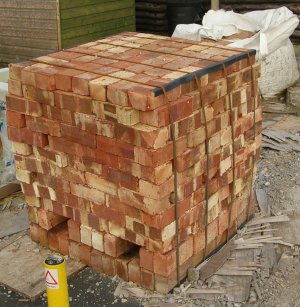
Bricks
After the two world wars came reconstruction and a surge in demand for bricks. Up to the 1950's bricks were loaded by hand into open wagons, a Peco 'brick' load in a five plank open wagon would be a regular sight into the early 1960s, virtually dissapearing by the later 1960s as the pallet became the standard way of shipping bricks. This load, if using the built-in supports inside the Peco wagon, would be too deep for a seven plank wagon. Personally I tend to remove the supports from the inside of the Peco wagon bodies, mounting my Peco loads on a central support, these days I favour Plastruct square section tube for this.
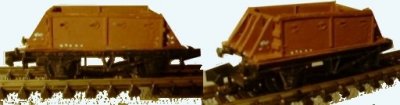
With the arrival of the pallet after the Second World War British Railways built a range of special wagons to carry palletised bricks. These were converted from other types, the Palbrick A's were based on redundant steel 'Medfit' wagons and early examples retained the eighteen inch high 'Medfit' ends. The Palbrick B's carried a slightly heavier load and did not have the 'medfit' ends. See Kit Bashing section for a picture of palbrick wagon models and modelling suggestions.
Fig___ Palbrick B Wagons
The pallet was handled using fork lift trucks or, in the case of bricks, a special two-pronged frame used with a crane. As the unit load idea proliferated more locations had the handling gear supplied to handle it. To reduce costs further a method of stacking bricks with holes for the fork lift in the stack and banding them together with metal strips. This method was in use by the early 1980s, the photo shows a typical example.
Fig___ Fork-liftable brick stack
In the air-braked era OBA wagons have been used to carry palletised bricks and 'breeze blocks', often packed in using old motor car tyres for protection. These modern loads tend to be wrapped, so a simple cube of wood with a paper wrapper can be used to represent them.
Building stone, aggregates and sand
Prior to the second world war building stone was mainly shipped by the wagon load in general mixed goods trains. Most building stone moved by rail was shipped as cut blocks carried on low sided wagons often with some straw or bracken under the block and with chains to hold it in position. You are unlikely to find stones or pebbles which look the part for building stone and the best option is probably to make up the blocks yourself by coating any suitable sized rectangular object with Milliput.
Aggregates (broken stone for road making, building work, cement and railway ballast) were not a common load prior to World War Two, most of the demand being met from local sources. Iron and steel works used a great deal of broken limestone. Crushed stone became a major commodity in the property and motorway boom of the 1970's however and represented a major source of income for BR in the 1980's and 90's. Originally BR used redundant vacuum braked four wheeled iron-ore tipplers (TOPS code MSV) for this trade, and in the mid 1980's some of these MSV's were still being used for Peakstone traffic, but by the late 1980's the rolling stock was almost exclusively PO hoppers or tippler wagons.
In the post privatisation era a lot of aggrigate is moved in simple open wagons, the heavily ribbed doorless type which has gained favour since the 1990s. These wagons are unloaded by a crane with a grab.
For N gauge the best option for aggregates is fine sand, glued to a removable wagon insert and painted white for limestone or granite chippings.
Building sand was shipped in bulk in low sided (three plank) open wagons and usually shovelled by hand into road delivery vehicles. Although the sand producers went to great lengths to dry the sand before shipping as far as I am aware building sand was not sheeted over in transit. More specialised sand was shipped in sheeted wagons and, in the BR era, in closed hopper wagons (both the presflo and prestwin wagons were used for this as well as the standard BR 'covhop').
Slates and Tiles
Slates were mainly brought in from Wales, narrow gauge railways were used to carry the stone from the quarry to the interchange with the main line systems. Most slate was moved round the coast by sea, so if your layout is based in the North East local company wagons carrying slate from the docks or small river berths would be seen. When travelling on the standard gauge the slates were stacked on end in open wagons, usually low sided types (three plank types being most common). You can tell the origin by the colour (North Welsh slate is dark grey, slate from Cumbria is purple). Only a single layer would be loaded into a wagon due to the weight of the material, and it was common practice to lay a bed of bracken or straw in the bottom of the wagon to cushion and protect the bottom edges of the load.
Tiles were made by brick works, and brick works were found whenever there was a suitable clay soil. Tiles form a classic load for the H type containers which, as they had a lid, makes life for the modeller easier.
Glass
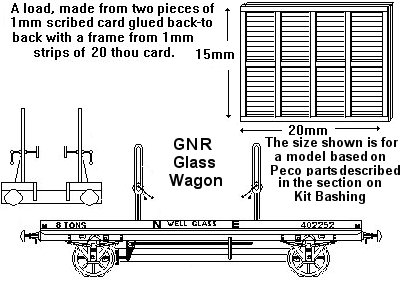
Glass was shipped from the factory packed in flat wooden cases, the railways provided specially built or modified wagons for this traffic. Some companies (such as the LNWR) used a standard open wagon fitted with special support frames, other companies built special drop-centre wagons to allow the carriage of larger sheets for shop windows and the like. The flat cases are easy to make, simply two sheets of 1mm scribed card glued back-to-back with an external framing of 10x20 thou strip. These cases would be clearly marked 'Glass' and 'Fragile' and would often have a 'This way up' marking as well. The original standard seems to have been for cases a maximum of eight feet high and they could be anything up to three feet thick (with several sheets of glass packed inside). The length varied but the supporting frames on the wagons were about six feet apart, so the cases would need to be at least that long and earlier wagon types could carry cases up to about sixteen feet long, the LMS/LNER/BR type wagons could carry cases up to about 18 feet long. My model has a rather short well, so the case was roughly ten feet long.
Fig___ GNR glass wagon and load
I have seen photos of BR era glass wagons showing them loaded with multiple cases, some were covered with a tarpaulin sheet.
Cement and Mortar
Cement was originally shipped in cloth bags or wooden kegs (actually these kegs were quite large barrels, perhaps three feet high). From the later 1920's the paper sack was introduced and caught on rapidly. All these were normally shipped in vans (occasionally sheeted open wagons) and as cement has a strong bleaching action the cement firms often provided the vans to avoid claims from the railway companies.
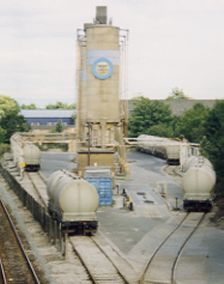
Bulk cement was shipped in hoppers from the mid 1930's, the LMS built some steel bodied hoppers and the GWR converted some of their wooden bodied grain hopper vans in the 1930s (see Goods Rolling Stock Design - Specialised Rolling Stock). In practice the hoppers proved difficult to empty with much banging on the sides required. These hoppers would not be unloaded in a normal goods yard but might be used to supply an outlying bagging plant. In the 1950's the 'presflo' wagons appeared, using compressed air to 'fluidise' the cement and pump it into special road wagons (later into track side silo's).
Fig___ Cement depot in former goods yard
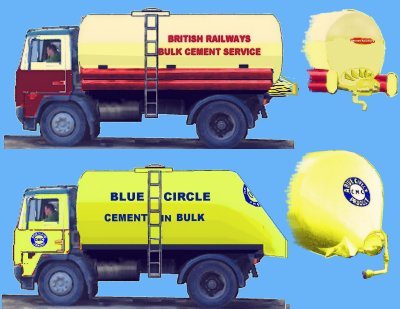
These wagons might well appear in a local yard and British Railways provided the special road lorries for the final delivery. Modelling the early BR bulk cement lorries is quite easy using a suitable flat-fronted or forward control lorry kit with the tank on the back made from a Ratio oil tank. The thick flexible hoses used for transferring the cement were carried in tubes mounted on the lorry as shown. These can be represented using any 1.5mm diameter tube or wire with a thin strip of paper wound round the end. The connection at the rear of the wagon can be formed by gluing a short length of rod into the existing socket on the tank end and building this up with Milliput. The later type with the drooped cone rear takes a little more work, replacing the end with a cone of card, positioned and cut to suit.
Fig___ BR Bulk Cement Lorry and later Blue Circle type