Regarding model railway track there are a couple of points which need to be raised. Traditionally the British have tended to use foreign mechanisms for their locomotive models, however given the more restricted loading gauge on British lines it was often difficult to fit the loco body onto the available chassis or indeed onto a British made chassis. As a result a compromise was adopted using a slightly larger scale for the body but retaining standard model railway track. This situation first reared its head with the 'OO' models, built to a scale of 1:76 or 4mm to the foot. These actually run on HO track, which has a scale of 1:87 or 3.5mm to the foot. As a result the track is approximately 14% under scale, the rails and the sleepers are too close together. This has resulted in a number of variations requiring hand-built track such as 'EM' and P4, both of which use a gauge of just over 18mm as opposed to the 16mm of the standard commercial track. The use of over size bodies was then perpetuated in N by adopting a scale of 1:148 for 'British N' but using continental track with a gauge of 9mm, corresponding to a scale of approximately 1:160. The track gauge at 1:148 should be 9.7mm and again the rails and sleepers of commercial track are too closely spaced. For people working in N who required a fine scale appearance the solution adopted was to use the already established scale of 2mm to the foot, using a scale of 1:152 and a gauge of 9.4mm.
Whether this is a problem depends upon whether you find the incorrect gauge and sleeper spacing offensive. Having worked with both 'OO/HO' and 'British N' I have personally always found the appearance acceptable and I suspect my poor modelling skills would make the transition to 2mm rather more difficult than I would like. In particular hand built track puts me off the idea, I just like playing trains and I can live with a few inaccuracies. If commercial track became available I might consider building the rolling stock but this is more likely in 2mm scale than British N.
To add to the confusion there are now a number of Japanese 'N' gauge models on the market, however as much of the Japanese railway system uses a gauge of about three and a half feet they build some of their models to a scale of 1:150. Because of the difference in the loading gauge many Japanese N models are larger than their British counterparts. To further complicate the issue the Japanese also operate some 'standard gauge' lines, mainly associated with their high speed lines, so they also sell models built to a scale of 1:160, as with the European N Gauge models these are slightly smaller than British N. Having said which the Japanese models, both track and rolling stock, have an excellent reputation for quality, I have a couple of now rather elderly Tomix 0-6-0 shunters that I use as 'industrial' loco's and I am well pleased with their performance.
Another point worth raising is the quoted radius of set track curves. In model railway terminology the quoted radius is measured to the centreline of the track, hence a nine inch radius U curve requires about twenty inches of baseboard.
It is a very good idea to have a space of perhaps an inch and a half between the outside rail of the track and the edge of the baseboard and I now also add a strip of wood along the edge of the baseboard, raised to form a low wall and covered in home-made 'brick paper'. This eats into the available space on the board but prevents models falling to the floor if they come off the track. I learned this the hard way as I am now the proud owner of a Farish Class 37 with no buffers at one end.
Real track is not shiny and bright, its dark and dirty so painting the sides of the rails improves the look of a layout no end. Humbrol used to offer a paint called 'track colour' for this but that is currently not available, their 'rust' colour can be used however. Painting the track with a brush after it has been laid is possible but time consuming, a better option is to paint the track before laying it. I invested in rather a lot of Peco flex track some years ago when it was on offer, and I am still working my way through the stock. This track is not ready-ballasted so it is easy just to spray it with a suitable colour (for ready ballasted track such as Fleishmann you really need to go back to the paint brush). I don't own an air brush so I used motor car brown primer aerosols to spray the plain track (once it had been cut to size ready to lay and the track feed wires soldered in place if required). Whilst the paint is still wet wipe the top of the rails with a rag soaked in thinners and wrapped round a scrap of wood. This removes most but not all of the paint on the top of the rails. You then also need to clean off the paint at the ends where the rail joiners will go, a fibreglass pencil is really useful for this, I have recently changed to using one with a brass refill and this seems even better. Once the paint has dried a Peco track cleaner finished the tops of the rails.
I later found 'Bestial brown' paint from 'Games Workshop', this looked better (I thought) and seemed more resilient than the primer I had been using when bending the track about during fitting. Unfortunately Bestial Brown is currently not in production as an aerosol (it is available as a pot of paint though).
Points I paint by hand, I have had problems getting the moving blades clean enough to provide reliable current switching when I used a spray for these. If using an aerosol you can spray this point blank on to a scrap of tin foil and use a brush to transfer the paint to the rails and sleepers.
I have found that it is easiest to solder dropper wires to the rail joiners than to the rails themselves, I use six inch lengths of either thin tinned copper wire or 5 Amp fuse wire. These wires are pushed down through holes in the baseboard and connected to the power lines using chock-block connectors screwed under the baseboard.
Once the track is laid you need to ballast it and for the last few years I have used Chinchilla Sand from the local pet shop for this. It is fine (do ask for the type without the seeds in it) and works well as N Gauge ballast. I use a redundant kitchen cleaner spray bottle to pre-soak the ballast with water mixed with a drop of washing up liquid. Set the spray gun to produce a fine mist, point it across the tracks and hold it about a foot above. Do not point the spray at the ballast itself as it will blow it about. I then use a large eye dropper (a plastic tube with a rubber bulb on the end) to drip diluted PVA (60/40 PVA and water, again with a drop of washing up liquid added).
I am very sparing anywhere near the points, it is better to go back and do these with some neat PVA applied with a match stick and some ballast sprinkled over it. Take care on Peco points that you do not gum up the little over the centre spring behind the moving sleeper on the points and make sure no ballast is stuck inside the flange ways.
I have no idea what chinchilla sand is made of but if it is piled deeply and fixed with diluted PVA I have found it has a tendency to cake and crack as it dries. All I do then is add some neat PVA over the affected area and sprinkle on a bit more sand. Filling in around the track with scrap cardboard reduces the required depth of sand. The stuff I use is almost pure white but it takes diluted water-colour paint quite well even when PVA'd to the baseboard. Alternatively you can cover the point rails with paper to protect them and spray the track with Games Workshop grimy grey paint to tone it down a bit.
Peco foam underlay is easy to fit, just lay a strip of glue down where the track is to go and press the track down onto this. The glue soaks up through the foam and sticks the track as well. This ballast does not cause points to gum up and provides quiet running. There are however two drawbacks. Firstly it lifts the track slightly, so trackside structures such as platforms,tunnels and bridges need to be raised slightly (I use thick card cut to fit). Secondly the ballast on parallel tracks does not meet in the middle so you have to fill-in the gap. You can stretch a spare length of the foam (to make it slightly narrower) and insert it upside down as a filler but you will still see the joints at the sides. One option is to use chinchilla sand, laid on neat PVA, to cover the area. Both the Peco foam and the chinchilla sand will take up diluted burnt sienna water colour paint which blends everything together and gives the track that well used look.
Buffer stops on a model railway (at least in N) tend to be a bit fragile, they can be knocked off or damaged by even a small tank engine. The most robust option is the Peco 'sleeper built' buffer, this has holes at the rear to hook onto the end of the tracks and notches at the front to clear the rails. It is best to fit these before ballasting the track.
Fig___ Securing model buffers
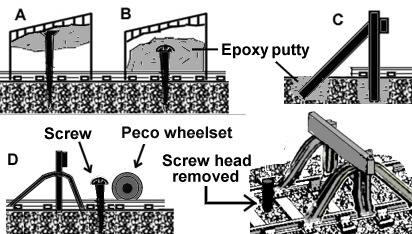
To prevent them being knocked off by a 'rough shunt' the Peco sleeper-built buffer stops can be fixed in position, either by drilling a hole in the top and adding a wood screw or by sitting them in a bed of epoxy. I would suggest adding some epoxy-putty to the inside of the buffer and inserting the screw (coated in grease) whilst this dries. You can then counter-sink the screw head as shown in Fig___ 'A'. Alternatively you can cut away the rear mounting holes so the buffer can be placed onto the track, grease the inside or line it with cling film and press it down onto some epoxy putty built up around a wood screw as shown in Fig___ B. Either method will make the item solid and secure.
Making the timber-built buffers yourself, either from strip wood or even match sticks offers the possibility of setting them into the baseboard surface as shown in Fig___ 'C'. This however assumes the surface is suitable, I use a soft wood felt like material sold for use in expansion joints in concrete. With the vertical supports and the rear braces set in this way, and well glued, the result is a strong buffer which is able to withstand the odd hundred mile an hour collision.
To protect a rail-built buffer place a wheel-set on the track and screw a small wood screw down into the ballast between the sleepers. When the head of the screw reaches the axle on the wheelset back it off a turn and hacksaw off the head of the screw. This leaves a stub of metal that will catch the axle on any wagon moving toward the buffers as shown in Fig___.