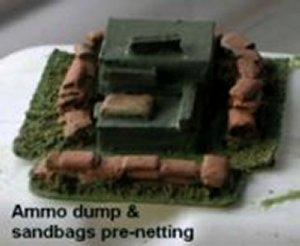
I wanted to make fuel and stores dumps, armies tended to have quite a lot of these, the trucks were better used transporting things so at the business end they off-loaded and returned for another load. Generally these dumps were camouflaged to protect them from marauding enemy air attack. Ammunition and fuel dumps generally consisted of a lot of smaller dumps spread over an area to minimise the risk of a single shell or bomb setting the lot off. Ammunition in particular seems to have been dumped in folds in the ground, or (occasionally and when in place for some time such as the build up to an offensive) protected by low sandbag walls. Sandbags are discussed separately in another section.
The basic stores dumps were made by cutting rectangles of card and mounting these on either lengths of cut-down match stick or by adding a strip of card to make them into a box shape. These were then painted, black lines added to suggest separate boxes, and dots of white ink from a gel pen added to represent markings. On some a few actual model boxes were added, mainly from odd model railway accessory sets (Roco Minitanks used to offer a lovely set of ammunition boxes but these seem hard to find these days). Lengths of match stick are handy, Bryant and May extra long matches are substantially thicker than ordinary pocket matches and make acceptable ammo boxes if partially obscured by the netting.
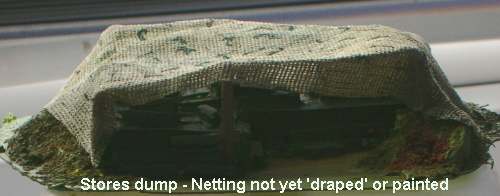
The piles of boxes were glued down with Uhu to a pre-painted card base (pre-painting the card base means you can iron it flat between two sheets of Bacofoil if the paint has caused it to warp). 'Poles' of string wrapped in cigarette paper were added (you can use cocktail sticks if there is no danger of people standing or falling on them) and ground cover added using teased out and painted scouring pads and dried tea-leaves (for bare earth). See also the section on trees for more on using scouring pad material. A bandage cammo net was then soaked in matt interior wood varnish and draped over the lot, moulding it down into a 'draped' shape. Cammo netting is discussed separately in another section, the example below needs more markings on the netting, which also needs a wash with varnish to get the proper 'draped' appearance. An Airfix figure can stand under the netting to give some idea of the scale of the thing.
For the fuel dumps I needed a lot of oil drums, which are quite expensive to buy. I used the thick straws from a McDonald's, which are about the right diameter. These were cut to length (using a model railway oil drum to get the size) and each 'drum' had a bit of tissue soaked in PVA pushed into it to fill it up a bit. This lot was left to dry overnight.
The following day I added a 2mm thick coating of Polyfilla mixed with Uhu glue to a pre-painted card strip base and pushed the drums into this so they were all close to the same visible height. These strips were then left to set solid.
Once set I added a little pollyfilla to fill up the tops of the drums and painted the drums very dark grey (almost but not quite black). Once the paint had dried I laid the rows of drums flat, smeared Uhu onto some thread and laid this across the row of drums about a third of the way down the sides. Using an old knife blade to push the thread down between the drums I then gently pulled the thread away. Uhu 'strings' dreadfully but in this case it left a nice line of Uhu along the drums, representing the ribs on the side. I repeated this to get the second rib. Again leave everything to dry.
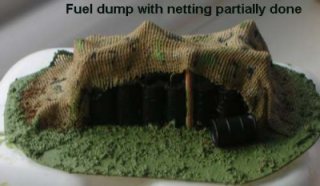
Once the strips are dry you can set them up in an L or U shape (depending on how much will be covered in cammo netting) and glue them to a pre-painted card base. The example shown below had a 'dressing' of dried tea leaves added around the outside of the drums before painting to simulate grass. Additional 'drums' were then added to the inside of this shape, bedded into a thick coating of Uhu, each one packed with tissue and topped off with Polyfilla. Leave to set solid then paint.
Posts were then added and cammo netting made of gauze bandage, soaked in matt varnish, was draped and formed over the 'dump'. The outer drums are visible, hence the ribs on the sides, the inner drums are just lengths of straw as only the tops are visible. On some I added a few jerry cans or (as shown here) an oil drum from a model railways accessory set.
For a larger dump (well back from the front line) you can use double-height lengths of the straws in the centre to give a two-tier stack. As these will be obscured by the netting they do not need the Uhu ribs along the sides (but the tops do need to be filled as this is visible looking down through the netting). If you make it a double height stack add a couple of planks (painted postcard) and a coil of rope (thread) to the scene, this is how the drums were pulled up onto the upper row.
For rows of drums lying on their sides I used the plastic straws that Nesquick kiddie's milk-shake drink mix stuff comes in, I can't remember the name of it, the lad was drinking it one day and I kept the straws. This is the same size as a McDonald's straw but has much thicker walls, not suitable for visible drums but nice and strong for drums laid down on their sides in a row and covered with netting. Again for a double-height row add a couple of planks and a coil of rope as described above.
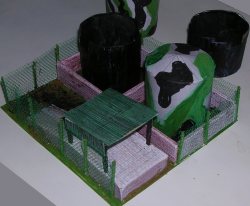
The lad wanted an air base so I made a bulk fuel storage point, which would also serve for rear areas of a battlefield. The tanks are sitting in a walled area (to contain spills) made from card covered with home-made brick paper. The chain-link fencing is dress netting from a fabric shop supported on cocktail sticks glued to the wall and bent paper-clips covered in a roll of paper where there is no wall to glue to. There is an oil barrel loading bay and a separate (not shown here) bulk tanker loading shed for top-loaders. I also supplied a set of 'blown up' tanks which can be substituted as shown.
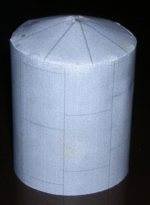
The tanks can be made from any suitable diameter tube, in this case they were all made from lengths of paper towel roll. The top was made by cutting a disk of card and removing a V shaped section, the card was then teased until I could hold the edges of the cut together easily, this joint was then glued with Uhu with a scrap of paper stuck to the inside to reinforce the joint. This results in a cone shape (the smaller the V shaped cut the lower the top will be) which is held against the end of the tube and marked. The cone is then cut and trimmed to fit neatly on the end of the tube and glued in place. The top disc is cut from the paper and a V shape cut away, make this smaller than the V cut from the card, the paper is then glued to the card top, with a slight overlap where the sides of the V meet. The edges of the paper top are then cut radially to leave a set of strips, about half of which are then cut away, the remainder being glued down to the sides of the tube. A plain paper wrapper is then added round the tube below the stuck down strips from the top, this makes the whole tube symmetrical. Now glue on the printed paper wrapper for the tank side, covering the cut bits at the top of the sides.
The tank shown below was a 'reject' from a set originally made for an N Gauge (1:148 scale) model railway tank farm, hence they are 'dull silver' which was achieved by printing the lines for the tank plates on a black and white laser printer. For the tops I printed circles with radial lines. The tanks for the military set were 'camouflaged' using a couple of CD marker pens that happened to be to hand, if the colouring is thin enough the printed panel lines will show through. If you use Uhu (liberally) to glue the paper covering in place you can get away with water colour for the colouring, it wrinkles up a bit when wet but dries flat again, and again the panel lines will show through.
The example shown had been rejected as I put the paper wrapper on the wrong way round, this would look okay if camoflaged but may just get a coat of water colour for use in a domestic fuel merchants yard (handy for the outskirts of a town).
The blown up tanks were a length of tube covered inside and out with plain paper that had been tinted with thinned black ink and when dry gone-over with a black magic marker, the paper was then ironed between two sheets of newspaper before gluing to the tube. The tops of the tube were cut about to represent failed panels some partially melted, the tube was stuck to a paper base and 'wreckage' added to the bottom of the inside from odd scraps of trimmed off card from the bin, all blackened with the magic marker pen and glued with Uhu.